It's easy to resize images in Microsoft Word! Here are instructions based on the ones at Microsoft's office.com. Since there are so many different versions of Word, these may not be exactly what you need. If that's the case, try googling your version, platform, and a phrase such as "resize images".
Resize manually
Click the picture that you want to resize.
To increase or decrease the size in one or more directions, drag a sizing handle away from or toward the center, while doing one of the following:
To keep the center of an object in the same place, press and hold CTRL while you drag the sizing handle.
To maintain the object's proportions (recommended!), press and hold SHIFT while you drag the sizing handle.
To both maintain the object's proportions and keep its center in the same place, press and hold both CTRL and SHIFT while you drag the sizing handle.
Resize to an exact height and width
Click the picture that you want to resize.
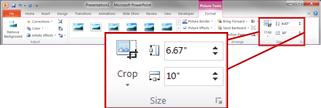
Under Picture Tools, on the Format tab, in the Size group, enter EITHER a Height or Width. The other measurement will change proportionately. If you are okay with changing the proportions (not generally recommended, as it can make the image look odd), then uncheck the Lock aspect ratio check box. You can then enter both a Height and Width measurement.

NOTE If you do not see the Picture Tools and Format tabs, make sure that you selected a picture. You might have to double-click the picture to open the Format tab.In the Size group, click the Size and Position dialog box launcher .
.- TIP To apply the same height and width to different objects, select all objects that you want to have the same dimensions, and then in Size group, enter the dimensions that you want in the Height and Width boxes. To select multiple objects, click the first object, and the press and hold CTRL while you click the other objects.

